 Pin
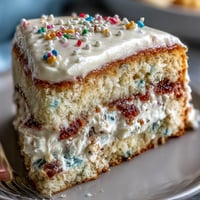
Pin My neighbor showed up at my door one February afternoon with a box of King Cake from New Orleans, and I spent the next hour trying to recreate that festive magic in bar form. The bright purple, green, and gold colors reminded me of confetti cannons and jazz music, so I started thinking about how to capture that celebration feeling without the complexity of a traditional ring cake. These sugar cookie bars came together on a rainy day when I wanted something that looked impressive but wouldn't keep me in the kitchen all afternoon. The result? A dessert that tastes like a party tastes, if that makes sense.
I brought a batch to a Mardi Gras party last year where nobody expected homemade desserts, and watching people's faces light up when they bit into that buttery cookie base with the snappy icing layer felt like I'd done something genuinely thoughtful. One friend immediately asked for the recipe, another just silently grabbed a third bar, and that's when I knew these belonged in my regular rotation. There's something about the combination of bright colors and that delicate sweetness that makes people feel celebrated, even on an ordinary Tuesday.
Ingredients
- Unsalted butter: Use softened butter that yields slightly to a finger press—cold butter won't incorporate properly and you'll end up with dense bars instead of tender ones.
- Granulated sugar: Don't skip creaming this with the butter for a full 2 to 3 minutes; that's where the light, fluffy texture comes from.
- Large eggs: Room temperature eggs mix in smoother and create better structure than cold ones straight from the fridge.
- Vanilla extract: Standard vanilla works perfectly, but almond extract adds that subtle King Cake nod if you want it.
- All-purpose flour: Measure by spooning and leveling, not by scooping directly from the bag—that one habit prevents dense, heavy bars.
- Baking powder and salt: These aren't optional; they lift the dough and balance the sweetness.
- Ground cinnamon: Just a quarter teaspoon adds warmth without overpowering the vanilla and lemon notes.
- Lemon zest: Zest before cutting the lemon in half; a microplane or fine grater gives you the most fragrant result without the bitter white pith.
- Powdered sugar and milk for icing: Whisk these slowly to avoid lumps, and use just enough milk to reach a pourable consistency that spreads easily but doesn't run off the edges.
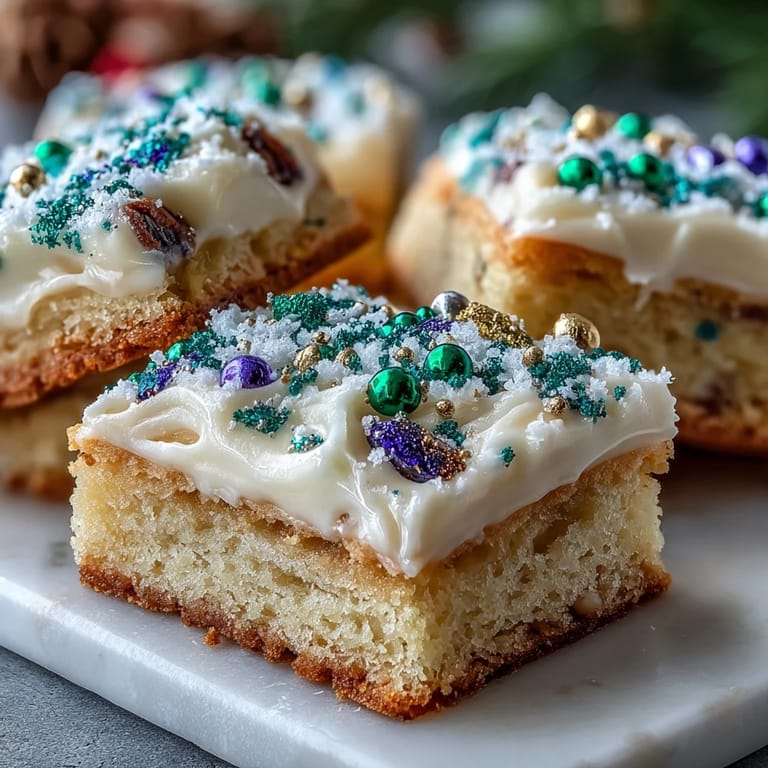
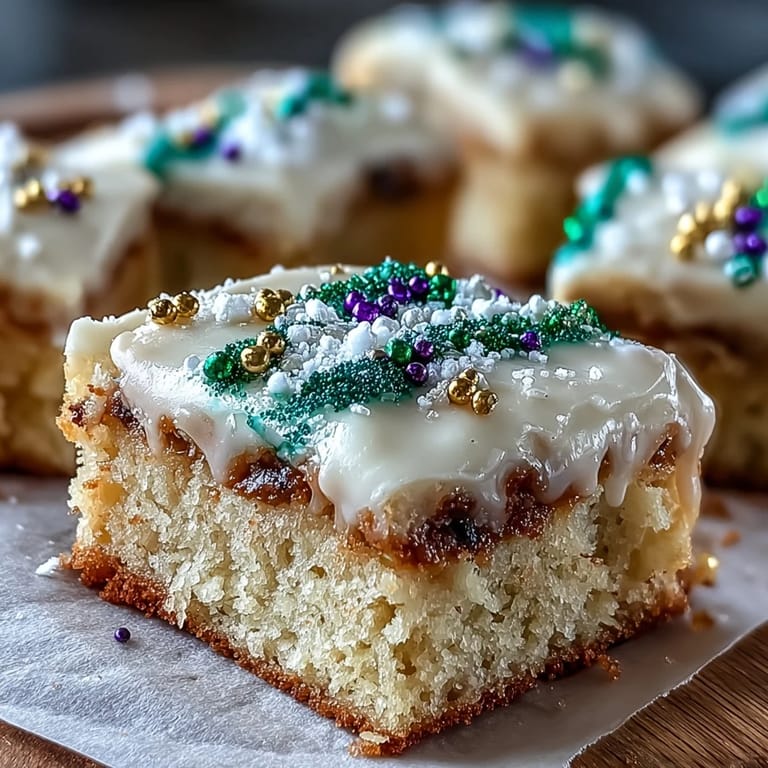
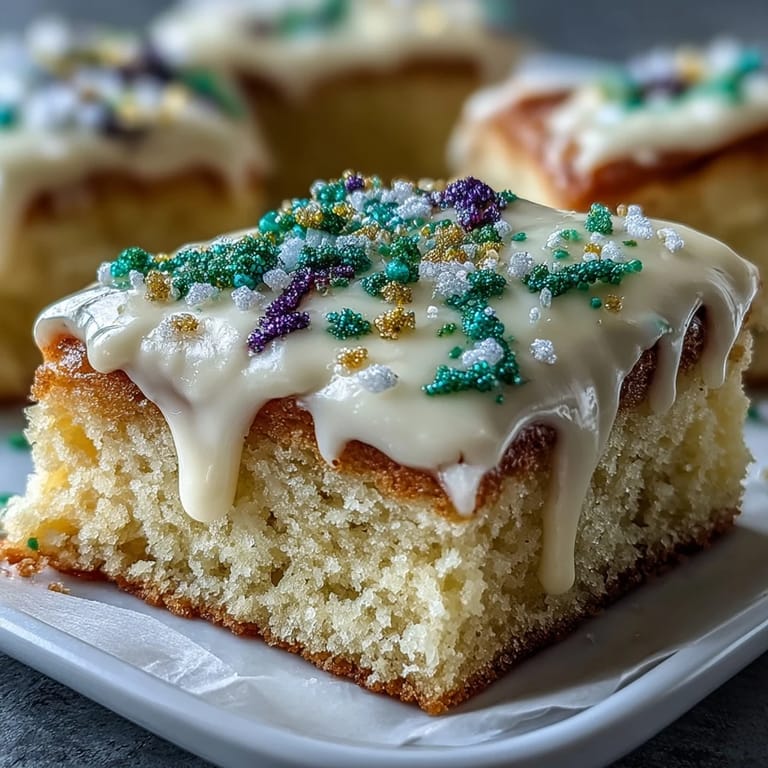
- Purple, green, and gold sanding sugar: These are the stars of the show—sanding sugar stays crisp and catches the light better than regular sprinkles.
Tired of Takeout? 🥡
Get 10 meals you can make faster than delivery arrives. Seriously.
One email. No spam. Unsubscribe anytime.
Instructions
- Prepare your pan and preheat:
- Line your 9x13-inch pan with parchment paper, leaving a bit hanging over the sides so you can lift the whole slab out after baking. This one step saves you from the frustration of trying to cut bars out of a pan.
- Cream butter and sugar until fluffy:
- Take your time here—about 2 to 3 minutes with an electric mixer gives you that light, pale mixture that's the foundation of tender cookies. You should see the mixture transform from dense and grainy to cloud-like.
- Add eggs and extracts one at a time:
- Beat each egg in completely before adding the next so they incorporate evenly, then mix in the vanilla, almond extract if using, and lemon zest. The mixture should look smooth and homogeneous at this point.
- Whisk dry ingredients separately:
- In another bowl, combine flour, baking powder, salt, and cinnamon so the leavening distributes evenly throughout the dough. This prevents pockets of dense flour in your finished bars.
- Fold wet and dry together gently:
- Add the dry ingredients to the wet mixture and stir just until combined—don't overmix or you'll develop gluten and end up with tough, chewy bars instead of tender ones. A few streaks of flour are fine; stop mixing once you can't see dry flour clearly.
- Spread dough into pan:
- Use a spatula or your hands to press the dough evenly into the prepared pan in a single layer. If it's sticking, wet your hands slightly or use parchment paper between your hands and the dough.
- Bake until set but not overdone:
- Bake for 22 to 25 minutes at 350°F—the edges should be lightly golden but the center should still feel slightly soft to the touch. The cookies will firm up as they cool, so resist the urge to bake until they look completely done.
- Cool completely before icing:
- Transfer the pan to a wire rack and let the cookies cool fully on the pan—this usually takes about an hour. Spreading icing on warm cookies will cause it to melt and slide off.
- Make and spread the icing:
- Whisk powdered sugar, milk, and vanilla together until smooth and pourable; if it's too thick, add milk one tablespoon at a time. Spread the icing evenly over the cooled base with a spatula, working quickly so you have time to add the sanding sugar before it sets.
- Add the celebratory colors:
- Immediately sprinkle the purple, green, and gold sanding sugars over the wet icing in sections or a free-form pattern—the icing needs to be wet so the sugar sticks. You can scatter them randomly or divide the surface into three sections for a more organized look.
- Let icing set completely:
- Wait at least 30 minutes for the icing to dry and harden before slicing, or the bars will be messy to cut and eat. A sharp knife dipped in hot water and wiped dry between cuts helps create clean edges.
 Pin
Pin My sister called to say she'd hidden a plastic baby in one of the bars at a family gathering, which turned the whole dessert into a game where nobody wanted to bite down too hard. It wasn't just about food anymore; it became this moment where everyone was laughing, nervous, and excited simultaneously. Sometimes the best kitchen moments aren't about perfect technique—they're about the chaos and joy that happens when people gather around something you made.
Flavor Variations to Try
Once you master the base, you can start playing with the subtle flavors that make these bars uniquely yours. Orange zest swaps beautifully for lemon zest if you prefer that brighter citrus note, and a pinch of nutmeg adds that traditional King Cake warmth without changing the overall balance. I've also experimented with replacing a quarter teaspoon of vanilla with maple extract, which sounds weird but creates this unexpected comfort-food depth that people can't quite identify but definitely enjoy.
Make-Ahead and Storage Strategy
These bars actually improve after a day because the icing becomes crunchier and the cookie base becomes more tender as it sits in an airtight container. I usually bake them the day before a party so I can focus on other things, and honestly, they taste better that way. You can even freeze the undecorated cookie base for up to two weeks, then defrost it, add the icing and sanding sugar, and nobody will know you didn't make them fresh.
The Tradition Behind the Colors
Purple, green, and gold are the official colors of Mardi Gras, each carrying its own meaning in the carnival tradition. Purple represents justice, green symbolizes faith, and gold stands for power—so when you're sprinkling those colors on these bars, you're honoring a celebration that's been happening since the 1700s. It's a small way to connect your kitchen to something bigger and more festive than just an ordinary dessert, and that connection is what makes these bars feel special even when you're eating them alone on a random Thursday.
- If you can't find sanding sugar in those exact colors, regular sprinkles work but won't have that same satisfying crunch and visual pop.
- The bars photograph beautifully in natural light, so if you're bringing them somewhere, save one perfect slice for a picture—people share recipes based on how good they look.
- Warn your guests about the plastic baby tradition before serving if you decide to hide one, because biting down unexpectedly on plastic is not the surprise anyone wants.
 Pin
Pin These bars have become my go-to dessert for celebrations, office parties, and moments when I want to show up somewhere with something that makes people genuinely happy. They're proof that you don't need complicated techniques or fancy ingredients to create something memorable.
Recipe Questions
- → What gives these bars their festive colors?
Traditional Mardi Gras sanding sugars and sprinkles in purple, green, and gold provide the vibrant topping that makes these bars visually festive.
- → Can I prepare these bars in advance?
Yes, the bars can be made 1-2 days ahead and stored in an airtight container to maintain freshness.
- → What flavorings enhance the base of the bars?
Lemon zest and cinnamon add brightness and warmth, while optional almond extract deepens the flavor profile.
- → How do you achieve the perfect icing consistency?
Whisk powdered sugar with milk and vanilla extract until smooth and pourable, ensuring easy spreading over the cooled bars.
- → Is there a traditional hidden element in these bars?
Often, a small token like a plastic baby or a whole almond is hidden inside, adding a fun tradition for guests.