 Pin
Pin I discovered these mini taco cups by accident on a Tuesday night when I had a box of small tortillas and needed to feed four hungry people in under an hour. Instead of rolling tacos the traditional way, I grabbed a muffin tin and pressed each tortilla into a cup—suddenly I had crispy vessels that held seasoned beef and melted cheese without falling apart. That first batch taught me that sometimes the best kitchen innovations come from working with what you have and a little bit of impatience in the best way.
I made a batch for my brother's surprise birthday gathering, and within five minutes of setting them on the table, they were gone—someone was already loading theirs with extra cilantro and jalapeños. That's when I realized these weren't just convenient; they were the kind of dish that makes people feel like you've put real thought into entertaining them, even though you've barely broken a sweat.
Ingredients
- Ground beef: 250 g of ground beef gives you enough seasoned filling for all 12 cups without overflow; I've learned that pressing too much meat into each cup causes it to bulge out the sides during baking.
- Onion and garlic: One small onion and a single garlic clove might seem minimal, but they perfume the entire beef mixture and prevent it from tasting one-dimensional.
- Chili powder, cumin, paprika, salt, and pepper: This blend creates that classic taco seasoning without being overwhelming; start with these proportions and adjust if you prefer more heat or earthiness.
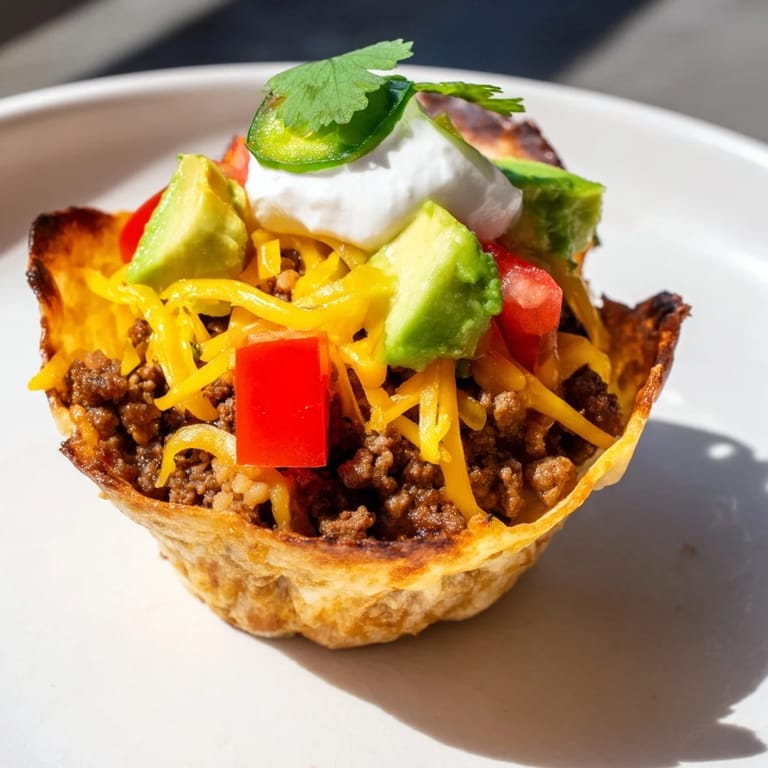
- Small flour tortillas: Street taco-sized tortillas are ideal because they're pliable enough to press without cracking and small enough to crisp up evenly; if you only have large tortillas, cut 10-cm rounds and they work just as well.
- Cheddar and Monterey Jack cheese: The combination gives you a melty texture that doesn't separate or become oily; using just one type tends to either become too sharp or greasy.
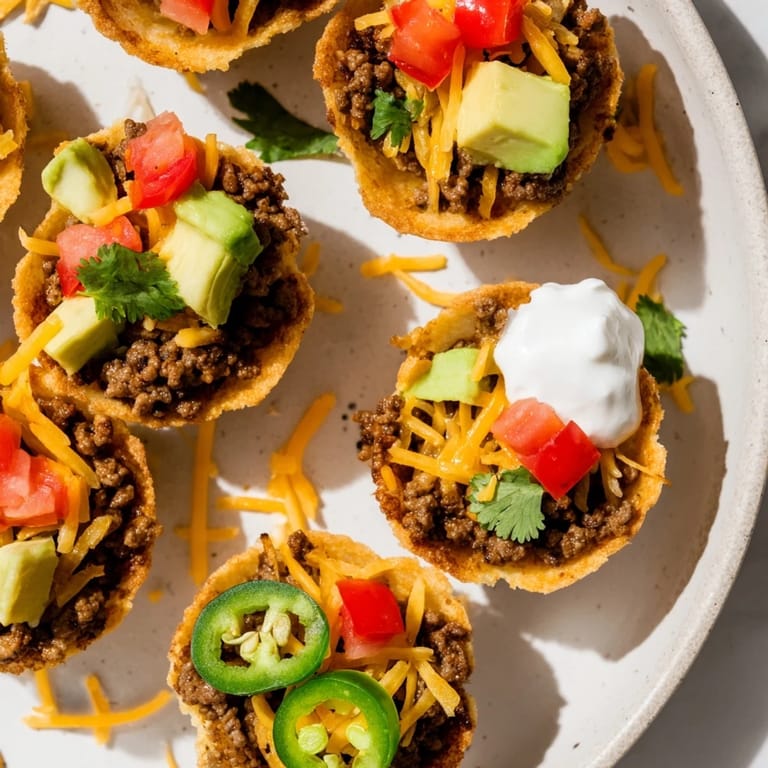
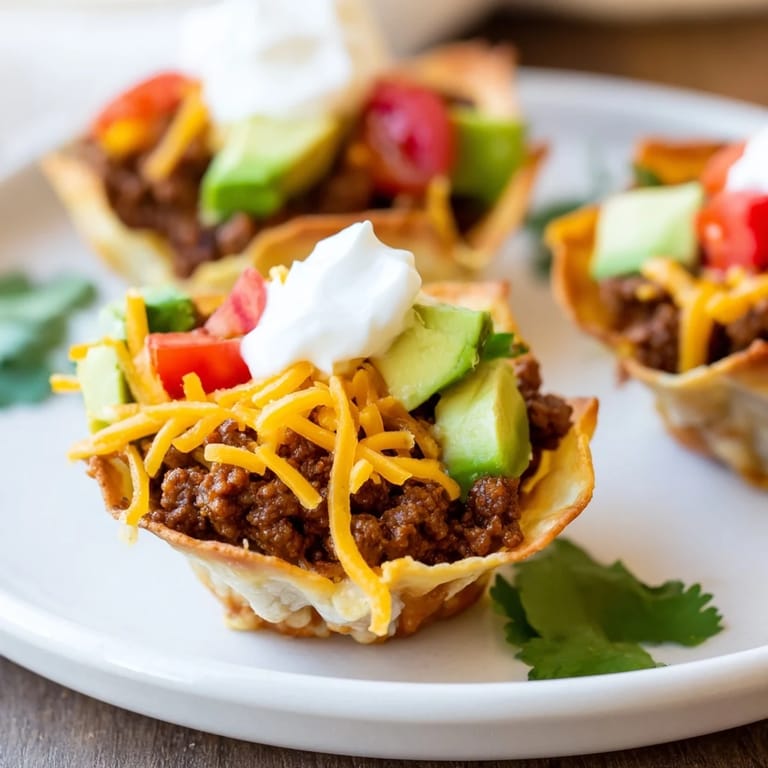
- Salsa, sour cream, avocado, cilantro, tomato, and jalapeños: These fresh toppings go on after baking so they stay bright and don't get mushy; pick whichever ones speak to you rather than feeling obligated to use them all.
Tired of Takeout? 🥡
Get 10 meals you can make faster than delivery arrives. Seriously.
One email. No spam. Unsubscribe anytime.
Instructions
- Preheat and prepare:
- Set your oven to 200°C (400°F) and lightly grease the muffin tin so the tortillas don't stick; this only takes a minute but saves frustration later.
- Cook the beef:
- Heat your skillet over medium heat and add the ground beef, breaking it apart with a spoon as it browns—this should take about 4 to 5 minutes and you want no pink remaining. The meat will release some fat, which is perfect for flavor.
- Build the seasoning base:
- Toss in your diced onion and let it soften for about 2 minutes, then add the garlic and cook until fragrant, maybe 30 seconds. This moment smells incredible and signals that your filling is coming together.
- Season with warmth:
- Sprinkle in all your spices—chili powder, cumin, paprika, salt, and pepper—and stir well, cooking for another minute so everything blooms and melds. Remove from the heat immediately after or the spices can become bitter.
- Mold the tortilla cups:
- Take each tortilla round and press it gently into a muffin cup, letting the edges crumple and fold naturally to form a cup shape. It doesn't need to be perfect; slight irregularities actually help them crisp up unevenly in the best way.
- Fill and top:
- Divide the seasoned beef evenly among all 12 cups, then sprinkle both cheeses over each one. The cheese will melt and hold the filling in place.
- Bake until golden:
- Slide into the oven for 10 to 12 minutes—you're looking for the tortilla edges to turn golden and crispy and the cheese to bubble slightly. Set a timer so you don't overbake; every oven is different.
- Cool and finish:
- Let them rest for 3 to 5 minutes out of the oven so the cheese sets and the tortillas firm up completely. Then crown each cup with your chosen toppings and serve while they're still warm enough that the cheese feels soft inside.
 Pin
Pin I once made these for a potluck where three other people brought taco-adjacent dishes, and I was genuinely worried mine would disappear into the crowd unnoticed. Instead, someone asked for the recipe before they'd even finished their first cup, and another person came back for seconds and thirds because they loved that you could eat them with one hand while standing up talking to friends. That's when I understood that sometimes the most memorable dishes aren't the most complicated—they're the ones that fit perfectly into how people actually want to eat.
Why These Work at Any Occasion
These cups blur the line between appetizer and main dish beautifully, which is why they've become my go-to when I'm not sure what category to cook in. At a casual dinner party, you can serve them as finger food and let people assemble their own toppings bar-style, turning the meal into an interactive experience where everyone feels like they're building something custom. On a random Wednesday when you're tired and hungry, they come together faster than takeout and taste infinitely better than drive-through tacos.
Customizing for Your Crowd
The beauty of this recipe is that it's a completely blank canvas once the cups come out of the oven. I've made versions with ground turkey for friends watching their fat intake, swapped in seasoned black beans for vegetarians, and even topped some with pulled chicken instead of beef. One friend who loves heat added a splash of hot sauce directly into the beef mixture, another person layered in black beans underneath the meat for extra protein and earthiness, and someone else skipped the cheese entirely and loaded theirs exclusively with fresh vegetables and cilantro.
Pairing and Serving Ideas
These shine alongside a crisp Mexican lager or a cold margarita, but they're equally happy paired with fresh lime agua fresca, horchata, or even just ice-cold sparkling water with a lime wedge. I've served them at picnics on a hot summer afternoon when nobody wanted anything heavy, and I've brought them to cold-weather gatherings where people appreciated being able to eat them while mingling without needing a plate or utensils.
- Batch these ahead by assembling and baking them completely, then reheating gently in a 160°C (320°F) oven for 3 to 4 minutes to restore crispness before adding fresh toppings.
- Double or triple the filling and freeze extra beef mixture in portions so you can make fresh cups on a random night without doing the full onion-garlic sauté again.
- Set up a topping station where everyone chooses what goes on their own cup—it turns a simple dinner into something interactive and makes people feel included in the cooking process.
 Pin
Pin What started as a Thursday-night solution to a half-empty pantry has become one of those recipes I make without thinking, the kind that feels less like cooking and more like assembling small edible gifts. Everyone who's tried them has asked for the recipe or requested them at their next gathering, which tells me these tiny, crispy taco cups have earned their permanent spot in my regular rotation.
Recipe Questions
- → How do I prevent the tortillas from becoming soggy?
Pressing the tortillas firmly into a lightly greased muffin tin and baking them until crisp helps maintain their structure and avoid sogginess.
- → Can I substitute the ground beef with other proteins?
Yes, ground turkey, chicken, or even black beans make excellent alternatives to beef for varied dietary preferences.
- → What cheeses work best for melting in these cups?
Cheddar and Monterey Jack are ideal for their smooth melting qualities and balanced flavors that complement the seasoned meat.
- → How spicy are the taco cups, and can I adjust the heat?
The seasoning includes mild chili powder and paprika, but you can increase heat by adding jalapeño slices or a dash of hot sauce to taste.
- → Can these mini taco cups be prepared ahead of time?
They can be assembled in advance but are best baked just before serving to retain crispness and flavor.