 Pin
Pin I discovered these protein cheesecake cups on an afternoon when I needed something that felt indulgent but wouldn't derail my gym routine. The magic hit when I realized no baking was required—just mixing, pressing, and patience. That first bite of creamy filling against the nutty, crunchy base made me understand why no-bake desserts have such devoted fans. Now they're my go-to when friends ask what I'm bringing to a picnic or when I need a post-workout treat that tastes like a celebration.
My sister came home from her first week of training for a marathon, completely wiped out, and I made these for her that same night. Watching her face light up when she realized they were high-protein, low-stress, and ready to eat immediately felt like the best kitchen moment I'd had in months. She's since asked me to make them every other week, and I've never complained once.
Ingredients
- Oat flour: This is the backbone of your crust—it brings a subtle nuttiness and holds everything together without being dense, though almond flour works beautifully if you're going gluten-free.
- Almond or peanut butter: Acts as the binder and adds richness; make sure it's the creamy kind, not the chunky stuff, so your base sets evenly.
- Honey or maple syrup: Just enough to sweeten the crust and help the mixture stick together—don't oversweetened it since the filling does the heavy lifting flavor-wise.
- Salt: A pinch seems small, but it's what makes people taste these and say, 'What's in this?'
- Reduced-fat cream cheese: Softening it ahead of time prevents lumps and makes mixing smooth and effortless.
- Greek yogurt: This is the secret to keeping things light without sacrificing creaminess; it adds tang and moisture without heaviness.
- Vanilla whey protein powder: Two scoops gives you roughly 13 grams of protein per cup without making it taste chalky or artificial.
- Vanilla extract and lemon zest: Vanilla rounds out the sweetness while lemon zest adds brightness—optional but honestly worth the extra 20 seconds of zesting.
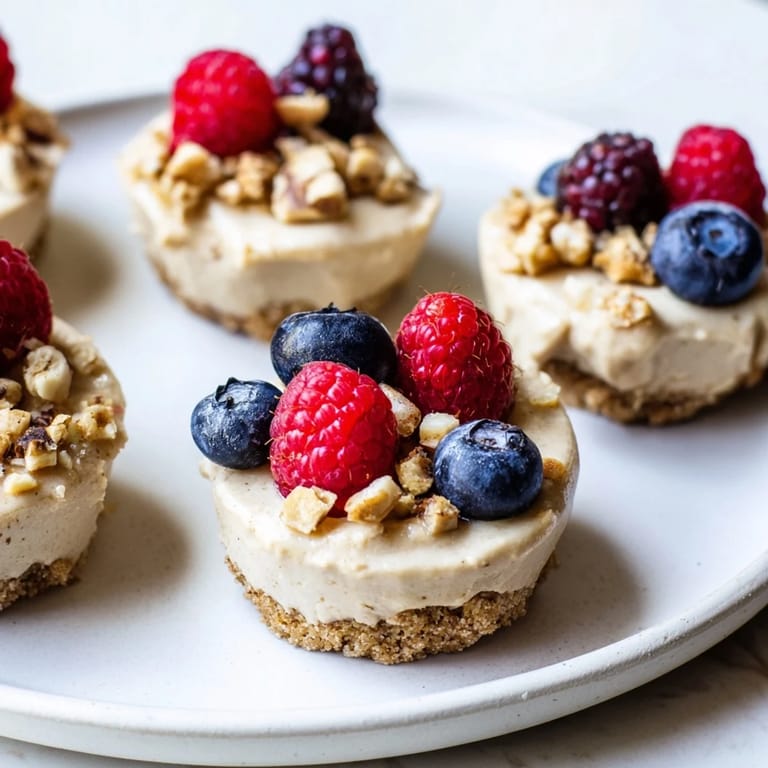
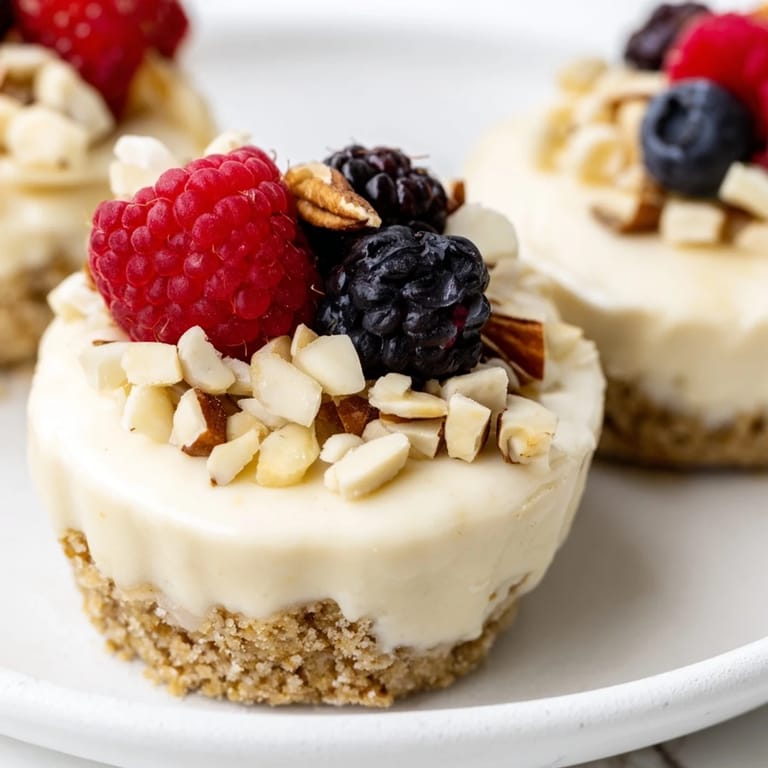
- Fresh berries, nuts, and chocolate: These are your chance to personalize and make each cup feel special.
Tired of Takeout? 🥡
Get 10 meals you can make faster than delivery arrives. Seriously.
One email. No spam. Unsubscribe anytime.
Instructions
- Make the crust:
- In a bowl, combine oat flour, nut butter, honey, and salt, stirring until you have a sandy, crumbly texture that holds together when squeezed. You're aiming for something between wet sand and cookie dough—press a small piece between your fingers and it should stick without being sticky.
- Press and set:
- Divide the mixture among six muffin liners, using the back of a spoon or your fingers to press it down firmly into an even layer. This is worth taking 30 seconds on because a loose base will crumble when you try to eat it.
- Prepare the filling:
- Beat the softened cream cheese in a clean bowl until completely smooth—any lumps now will stay in your final dessert, so go slowly and let the mixer do the work. Add Greek yogurt, protein powder, honey, vanilla, and lemon zest, then mix gently but thoroughly until everything is combined and creamy.
- Layer and top:
- Spoon the cheesecake mixture evenly over each crust, smoothing the surface with a spatula or the back of your spoon. Add whatever toppings speak to you right then—berries, nuts, chocolate shavings—knowing they'll set into the creamy filling as it chills.
- Chill and unmold:
- Let everything sit in the fridge for at least 2 hours, or overnight if you can wait. When you're ready to eat, gently peel back the muffin liner and enjoy them chilled straight from the fridge or at room temperature.
 Pin
Pin There's something satisfying about pulling these cups from the fridge, knowing they're packed with actual nutrition but taste like an indulgence. It changed how I think about healthy eating—no deprivation, just smart choices that happen to taste amazing.
Customize Your Cups
The beauty of these cups is how endlessly customizable they are. Swap the vanilla for almond extract, add cocoa powder to the filling for a chocolate version, or drizzle each cup with a spoonful of berry compote before chilling. I've made them with crushed gluten-free cookies for the base when someone in my circle needed to skip grains, and they were just as delicious. The filling is your canvas—you can keep it simple or get experimental.
Storage and Make-Ahead
These actually get better the next day as the flavors meld together, so making them the evening before you need them is smart planning. Keep them in the fridge for up to 5 days, and they travel well in a container for picnics, work lunches, or gym bags. If you want to prep even further ahead, you can make the crust and filling separately up to 3 days in advance, then assemble them the day before you plan to eat.
Why This Works as a Fitness-Friendly Dessert
Most protein desserts taste like they're trying to trick you, but these ones taste like dessert that happens to be good for you. The combination of Greek yogurt and cream cheese creates a texture that's genuinely creamy without being heavy, and the protein powder dissolves completely if you mix it properly. You're getting a legitimate treat with 13 grams of protein per cup—no compromise, no regret.
- Make a vegan version by swapping cream cheese for dairy-free ricotta or cashew cream and using plant-based protein powder.
- If you're sensitive to sweetness, reduce the honey in both the base and filling by half and let the natural flavors shine.
- Layer different toppings on each cup so you have variety in the same batch.
 Pin
Pin These cups are my answer to wanting something sweet after dinner without the guilt, or wanting to impress someone with a homemade treat that took almost no effort. They've become the dessert I come back to again and again.
Recipe Questions
- → Can I make these cups gluten-free?
Yes, substituting oat flour with almond flour and ensuring other ingredients are gluten-free makes this suitable for gluten-free diets.
- → How long should the cups chill before serving?
Chill the cups for at least 2 hours to allow the filling to set properly and the flavors to meld.
- → Are there variations for vegan options?
Use dairy-free cream cheese, plant-based yogurt, and vegan protein powder to create a vegan-friendly version.
- → What toppings complement these cheesecake cups?
Fresh berries, chopped nuts, and dark chocolate shavings add texture and flavor without overpowering the creamy filling.
- → Is baking required for this dessert?
No baking is needed; the base is pressed into liners and the filling is prepared separately before chilling to set.
- → Can honey be replaced with other sweeteners?
Maple syrup is a perfect alternative for a natural sweetener, maintaining the dessert’s subtle sweetness.